How to Use a Knife Sharpener

Every knife dulls. It is a simple fact of cooking. A sharp knife makes prep faster, safer, and more enjoyable. The trick is knowing exactly how to use a knife sharpener so you can restore that factory edge without damaging the blade. Whether you own a single chef’s knife or a full set, learning this skill will save you time and money.
Understanding Your Knife Sharpener
Knife sharpeners come in many forms. Pull through sharpeners, whetstones, electric sharpeners, and rolling sharpeners. The rolling design is especially beginner friendly because it guides the blade at a consistent angle. You do not need to guess or hold a steady hand. The sharpener does the work for you.
The two sharpeners we carry follow this rolling principle. Both use diamond abrasives for fast cutting and long life. 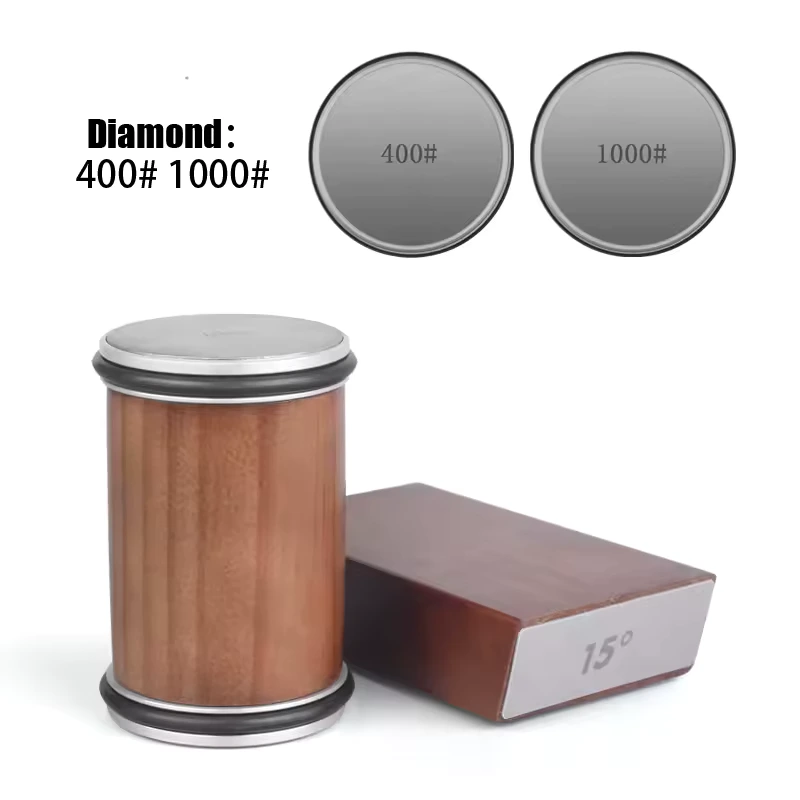 Magnetic Rolling Knife Sharpener$69.99 · currently out of stockView product → has a #400 and #1000 grit side, perfect for routine maintenance. adds a separate whetstone with #240 and #600 grits for knives that are very dull or need a coarse start. Understanding these differences helps you pick the right tool for the job.
Diamond abrasives are bonded to a metal or resin base. They cut harder steels effectively, including the high carbon stainless and powdered steels often found in Japanese knives. Unlike natural stones, diamond sharpeners do not need soaking or flattening. They stay flat and consistent for hundreds of uses. That makes them a practical choice for home cooks who want consistent results without extra prep work.
Preparing to Sharpen
Before you start, take a moment to set up. Clean your knife thoroughly. Remove any food residue or grease. A clean blade cuts better and keeps your sharpener clean. Lay a damp towel or silicone mat under the sharpener to prevent slipping. Magnetic rolling sharpeners stick to a steel surface, but a towel works on countertops. Make sure the sharpener is stable.
Safety is important. Always sharpen away from your body. Keep your fingers clear of the edge. Work slowly at first until you feel confident. If your knife has a very dull or chipped edge, check the blade for any loose fragments. A quick visual inspection prevents damage to the abrasive surface.
How to Use a Knife Sharpener: Step by Step
Step 1: Identify the Correct Grit
Start with the coarser grit if your knife is very dull or has small chips. For a knife that is still fairly sharp but not cutting as well, go straight to the medium grit. With Magnetic Rolling Knife Sharpener$69.99 · currently out of stockView product →, the #400 side is your coarse option and #1000 is your medium finish. With , the #240 whetstone is the coarsest, then #600 on the whetstone, then you move to the rolling sharpener’s #400 and #1000 diamond sides. Most home cooks need only the rolling sharpener for regular touch ups. But if you own a knife made from a very hard steel such as Shirogami or Aogami, the coarse grit may be necessary to establish a fresh edge after heavy use.
Step 2: Position the Knife
Hold the knife in your dominant hand. Place the heel of the blade against the sharpener’s rolling guide. The guide is the notch where the blade rests. Align the blade so it sits flat against both sides of the guide. Do not tilt it. The sharpener’s angle is preset, so you only need to keep the blade perpendicular to the sharpener. Rolling sharpeners typically set the angle between 15 and 20 degrees per side. This angle suits most Japanese and Western style kitchen knives. Check your knife’s original edge angle if you are unsure. A 15 degree angle is common for Japanese blades, while 20 degrees is typical for German steel.
Step 3: Pull the Knife Through
Apply light, even pressure. Pull the knife toward you in a smooth, steady motion. Let the rollers do the cutting. Do not saw back and forth. Pull all the way through until the tip passes the rollers. Repeat this stroke on the same side 5 to 10 times, depending on dullness. Then switch to the other side. Alternating sides prevents uneven wear. If the knife is extremely dull, you may need 15 to 20 strokes per side on the coarsest grit. For thinner blades, reduce the number of strokes to avoid removing too much metal.
Step 4: Check for a Burr
After a few passes, feel for a burr along the edge. A burr is a thin wire of steel that forms on the opposite side of the bevel. You can feel it by gently running your thumb across the edge (perpendicular to the blade, not along it). If you feel a small ridge, you have formed a burr. That means you have removed enough metal. Move to the finer grit side if you are using a two grit sharpener. The burr should be consistent along the entire blade. If you feel a burr only on part of the edge, focus your next strokes on the area that still feels smooth.
Step 5: Finish with the Fine Grit
Switch to the #1000 side of Magnetic Rolling Knife Sharpener$69.99 · currently out of stockView product → or (or the #600 whetstone if you started coarser). Repeat the pulling motion, but use lighter pressure. Five to eight passes per side should polish the edge and remove the burr. Wipe the blade clean. Test on a piece of paper or a tomato. The knife should slice cleanly without tearing. If the edge still feels rough, make a few more light passes on the fine grit. A polished edge reduces friction and helps the knife stay sharp longer.
Tips for Success
Do not press hard. Diamond abrasives cut fast. Heavy pressure only risks damaging the blade or the sharpener. Let the weight of the knife provide enough force.
Count your passes. Keep a tally so you do the same number on each side. This maintains a centered edge. If you lose count, stop and check the burr again.
Know when to stop. Over sharpening removes metal unnecessarily and shortens knife life. Once the knife is sharp, stop. You only need to sharpen again when performance drops. Many users sharpen once a month with regular use. More frequent cooks may do it every week.
For more detailed care, see our knife care guide.

Understanding Steel Types and Their Impact on Sharpening
Japanese kitchen knives are made from a variety of steels. High carbon steels like Shirogami (white steel) and Aogami (blue steel) take a very sharp edge but are more prone to rust. Stainless steels like VG-10 and AUS-8 are easier to maintain but may require slightly more effort to sharpen. Powdered steels such as SG2 or R2 offer excellent edge retention and can be challenging with softer abrasives. Diamond sharpeners handle all these steels well because diamond is harder than any common knife steel. If you own knives with high hardness ratings (60 HRC or above), the coarse grits in become especially useful for initial shaping. For softer stainless steels, the #400 and #1000 grits in Magnetic Rolling Knife Sharpener$69.99 · currently out of stockView product → provide a quick and reliable edge.
Knife geometry also matters. Thicker blades with a robust spine, like a Western chef’s knife, benefit from a slightly coarser grit to shape the edge. Thin Japanese gyutos with a narrow blade road sharpen quickly and need only a few light passes. Adjust your technique accordingly. If you notice the knife is getting too thin at the edge, reduce the number of strokes and switch to the fine grit sooner.
Maintaining Your Knife Sharpener
Your sharpener needs occasional cleaning. Diamond particles load up with metal dust over time. Rinse the rollers under warm water and scrub gently with a soft brush. Do not use soap if the sharpener has a magnetic base. Dry it thoroughly before storing.
Keep the sharpener in a dry place. The magnets in our rolling sharpeners are strong, but moisture can affect the base or the abrasives. A drawer or a magnetic strip works fine.
If the sharpener starts to feel less effective, it may be time to replace it. Diamond abrasives last for many sharpenings, but they do wear out eventually. When you notice the knife no longer gets as sharp as it used to, consider a new sharpener.
Store the whetstone from flat in a dry area. If it becomes uneven from use, you can flatten it with a dressing stone or a piece of sandpaper on a flat surface. This keeps the coarse and fine sides effective for longer.
Choosing Between Magnetic Rolling Knife Sharpener$69.99 · currently out of stockView product → and
Both sharpeners use the same rolling diamond mechanism. The difference is the extra whetstone set. If you maintain your knives regularly and they never get extremely dull, Magnetic Rolling Knife Sharpener$69.99 · currently out of stockView product → is all you need. It covers the two most common grits for everyday prep. If you buy used knives or tend to let them go for a long time between sharpenings, the extra coarse options in will save you work. The whetstone is also useful for thinning or repairing a damaged edge.
Think of Magnetic Rolling Knife Sharpener$69.99 · currently out of stockView product → as your maintenance tool and as your restoration kit. Many cooks start with the simpler one and add the whetstone later if needed. If you own multiple knives with different steel types, the versatility of gives you the flexibility to handle each one appropriately.
Who each suits: Magnetic Rolling Knife Sharpener$69.99 · currently out of stockView product → is ideal for home cooks who sharpen every few weeks and want a no fuss solution. suits enthusiasts who work with harder steels or restore older knives. Both are magnetic and compact, fitting easily in a drawer or knife bag.
Common Mistakes and How to Avoid Them
One common error is using too much pressure. Relax your grip. Another is not alternating sides. Always alternate. If you only sharpen one side, the edge will become lopsided and perform poorly. A third mistake is sharpening a dirty knife. Food residue can clog the abrasives. Clean your knife first.
Some people try to sharpen serrated knives with a rolling sharpener. Do not do this. Serrated knives require a different tool. Our sharpeners are for straight edges only.
Another mistake is sharpening a knife that is already sharp. If your knife still cuts paper cleanly, you do not need to sharpen it. Over sharpening on a diamond sharpener can thin the edge unnecessarily. Wait until the knife feels dull during normal use, such as when slicing tomatoes or onions.
If you are unsure which knife style suits your cooking, read our guide to choosing a knife.
Final Thoughts
Learning how to use a knife sharpener is a skill that pays off every time you cook. A sharp edge reduces effort, improves consistency, and makes the kitchen a safer place. Rolling sharpeners like the ones we offer take the guesswork out of the process. With a little practice, you will be able to bring any dull blade back to life.
Start with a clean knife. Use gentle, even strokes. Alternate sides and check for a burr. Finish with the fine grit. That is all it takes. You do not need expensive tools or years of experience. Just a good sharpener and a willingness to learn.
For more products, explore our full knife shop or browse sharpening tools in the sharpener category.
Photography: Manki Kim via Unsplash.